Object-Relational Persistence with Glorp
This document describes the Glorp object-relational mapper. By reading it, you will learn how to map your objects to a relational database. It presents step by step how to use Glorp and its basic and advanced concepts in a tutorial. At the end we include an Appendix that revisits relational database concepts. We thank the authors of the previous Glorp tutorials R. Withney and N. Pratt for having granted us the right to use some of their material. This document has been written by E. Maringolo and edited by S. Ducasse.
What is Glorp?
Working in a live object environment such as Pharo is great. You can freely create your domain objects and compose them as you like. Sometimes those objects can be stored in a way that preserves the original design but in other cases you have to store your objects in a Relational Database Management System (a.k.a. RDBMS). This requires you to flatten your object graph into relational tables managed by the RDBMS.
This process of mapping object to tables is called Object-Relational Mapping (ORM). It imposes certain constraints on the design of your object model to support persisting it in tables. Some models are easier to map onto tables than others, the difficulty lies in what is known as the Object-Relational Impedance Mismatch.
To work with relational databases, Pharo provides a battle-tested ORM created at CampSmalltalk a decade ago and maintained since then. Its name is Glorp for Generic Lightweight Object-Relational Persistence. It is usually called both GLORP (all caps, as an acronym), or Glorp (as a proper name).
Glorp is a full-featured ORM which offers a number of features to reduce the impedance as much as possible. Amongst those features, you'll find some features saving you from writing SQL queries by hand, managing transactions that rollback the changes to the objects in your image or commit them to the database, writing simple and complex queries using plain Pharo syntax, and other features that we will cover in this introduction chapter and in the advanced topics chapter.
Installation
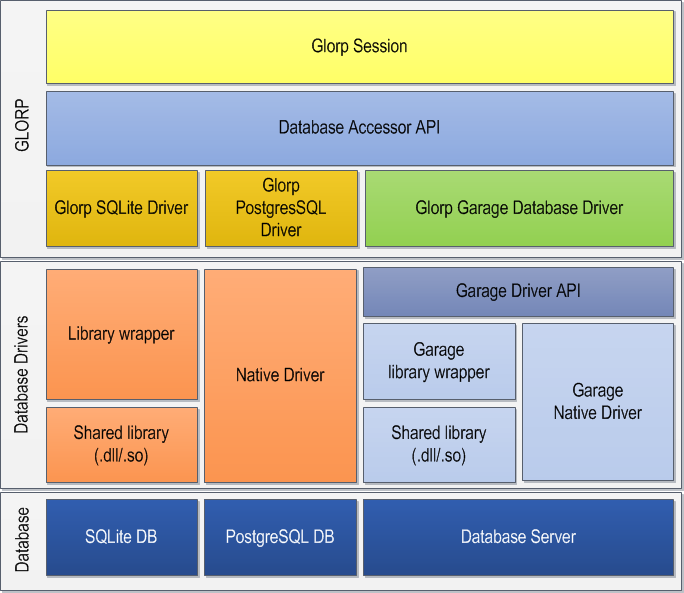
Database server
Before installing Glorp you should already have installed the RDBMS of your choice on your machine or a reacheable server, it could be PostgreSQL (http://postgresql.org), MySQL (http://dev.mysql.com/), SQLite (http://sqlite.org), or any other of your preference (as long it is supported). Hereafter we will refer to this RDBMS of your choice as the Platform.
Database drivers
Along with your working installation of your RDBMS you should have installed in your image the database drivers required to connect to the server.
Native drivers
With Native drivers the raw protocol is written in Smalltalk and it uses Pharo sockets to write and read the data from the wire. This has the advantage of being self contained, because you don't depend on an external file or setup to connect to a server. Also, because everything is written in Smalltalk it is debuggable using Pharo tools down to a very low-level.
Library wrapper drivers (FFI)
Library Wrappers, as its name implies, wrap an underlying Operative System
shared library like a .dll or .so, these wrappers will access
the shared library functions by means of FFI
(Foreign Function Interface) calls and data structures.
Using an external library enables you to use an official client implementation of a proprietary protocol like Oracle, or you can be sure that even if the protocol spec is open you can use the official version of it. In order to use it in Pharo you need to implement the wrapper classes and methods.
A common driver API
There are plenty of drivers available in Pharo, however those drivers have different API's making their use not directly interchangeable. Making it hard to migrate to a different driver or to simultaneously support different RDBMS.
To solve that there is Garage (aka Garage Drivers), that provides a common API for the different driver implementations. Garage is Pharo's analogous to ODBC, JDBC or ADO.NET drivers.
Using this common API your code won't need to change if, for example, you decide to move from MySQL to PostgreSQL, as long as you don't use exclusive features, because all the implemented drivers will conform to the common Garage API.
Available drivers
There are many drivers available drivers in different versions of Pharo, as the time of writing this, these are the currently supported drivers are:
- P3 (Native PostgreSQL v3 protocol)
- Garage
- PostgreSQL (Native)
- MySQL (Native)
- UDBC SQLite3
Glorp with P3
P3 is a modern, lean and mean PostgreSQL client for Pharo.
P3Client uses frontend/backend protocol 3.0 (PostgreSQL version 7.4 [2003] and later), implementing the simple query cycle. It supports plaintext and md5 password authentication. When SQL queries return row data, it efficiently converts incoming data to objects. P3Client supports most common PostgreSQL types.
More information can be found at its repository. To load it first install it through Metacello.
Metacello new
   baseline: 'P3';
   repository: 'github://svenvc/P3';
   load: 'glorp'.
Glorp packages for Garage
Glorp provides a Metacello configuration configured to load the core classes and/or its tests.
Metacello new
	smalltalkhubUser: 'DBXTalk' project: 'Garage';
	configuration: 'GarageGlorp';
	version: #stable;
	load.
It may be the case that you want to load Garage in an alpha version, in such case, you should load the most recent version instead of a stable version that may be not defined for a alpha stream.
One package is the Glorp-Core and there is also a Glorp-Tests package.
Glorp with UDBC / SQLite3
Glorp may also be configured to work directly with the UDBC SQLite3 driver in Pharo 5 (instead of the Garage drivers):
Gofer it
	smalltalkhubUser: 'TorstenBergmann' project: 'UDBC';
	configuration;
	load.
	(Smalltalk at: #ConfigurationOfUDBC) loadBleedingEdge.
Gofer it
smalltalkhubUser: 'DBXTalk' project: 'Garage';
configurationOf: 'GarageGlorp';
load.
(Smalltalk at: #ConfigurationOfGarageGlorp) project stableVersion load.Gofer it
smalltalkhubUser: 'DBXTalk' project: 'Glorp';
package: 'Glorp-SQLite3';
load.
GlorpSQLite3CIConfiguration new configureSqlite3.
GlorpDemoTablePopulatorResource invalidateSetup.Running the tests
Having loaded the database drivers and the Glorp packages, it is recommended to run the unit tests of Glorp, to ensure everything was loaded correctly and it is working properly.
Person: Our First Example Class
To put some of the concepts described previously into practice we will create
a Person class and store it into a PERSON database table,
all from within the Pharo environment.
Class definition
Let us define a simple class.
Object subclass: #Person
	instanceVariableNames: 'id firstName lastName birthDate'
	classVariableNames: ''
	package: 'Glorp-Book'
Instance methods
Let us define some stupid methods.
Person >> firstName: aString
	firstName := aString
Person >> firstName
^ firstNamePerson >> lastName: aString
lastName := aStringPerson >> lastName
^lastNamePerson >> birthDate: aDate
birthDate := aDatePerson >> birthDate
^birthDatePerson >> initialize
super initialize.
birthDate := '1/1/1970' asDateDefining a DescriptorSystem
As you can see the above created class and methods, don't have anything related to persistence and don't require you to inherit from a particular class.
Glorp models all the involved concepts (such as tables, columns, classes, etc.)
as first class objects, and then links instances of those objects in a DescriptorSystem.
It is the core of a Glorp system, it holds all the Glorp metadata,
such as the Tables, Descriptors and Class Models.
By using a separate artifact (in this case, a class) to define all the metadata of your system, you can decouple your business models from their persistence information. This separation of concerns is a good practice, and helps with the maintainability of your code.
Also, having an orthogonal description of your domain objects allows you to have more than one descriptor for the same business domain class. This is an important difference with patterns such as ActiveRecord where the persistence metadata is defined in the business domain class, and you can't reuse the same class for two different systems using different persistence configurations.
Defining a DescriptorSystem subclass
All the definitions and mappings are defined in a subclass of
DescriptorSystem, and for that we will create our own subclass as follows:
DescriptorSystem subclass: #GlorpBookDescriptorSystem
	instanceVariableNames: ''
	classVariableNames: ''
	package: 'Glorp-Book'
We said before that Glorp has a whole metamodel that involves describing the mapped class, the table(s) where it is going to be mapped and the mapping itself. To define each one of those, Glorp follows a convention in the method naming. We will mention the conventions below.
Class Model
We start by describing the class Person, and the way to
do it is by defining a method with the pattern classModelForYourClass:.
Here we describe the class model for the Person class.
GlorpBookDescriptorSystem >> classModelForPerson: aClassModel
	aClassModel newAttributeNamed: #id.
	aClassModel newAttributeNamed: #firstName.
	aClassModel newAttributeNamed: #lastName.
	aClassModel newAttributeNamed: #birthDate
Note that a class model is a Glorp representation of your domain class. Glorp uses it to
store metadata about your domain objects. The descriptor system provides hooks to let you define
such a class model. classModelForPerson: is one of these hooks. Based on the naming convention described
before, Glorp automatically associates this class model to your domain class.
Table Model
The class Person will be stored in a single table (which is the usual case), and we
provide the description of the table in a similar way as with the class
model, i.e., by following the tableForYOURTABLE convention.
Please notice the upper case of the table name.
Here is the definition of the table model for PERSON table.
GlorpBookDescriptorSystem >> tableForPERSON: aTable
	(aTable createFieldNamed: 'id' type: platform serial)
		bePrimaryKey.
	aTable
		createFieldNamed: 'firstName'
		type: (platform varChar: 100).
	aTable
		createFieldNamed: 'lastName'
		type: (platform varChar: 100).
	aTable
		createFieldNamed: 'birthDate'
		type: platform date.
If the table name is not uppercase, it is necessary to add
the method allTableNames with the correct case, e.g.:
For a non-uppercase table names we define the method allTableNames.
GlorpBookDescriptorSystem >> allTableNames
	"Return a list of all the table names that this system uses."
	^#('Person')
The serial datatype, explained in detail below, is an autoincrementing integer datatype. Every time you save a new instance Glorp will obtain a new integer and assign it to your instance.
Expressing mappings
Once we have the class model and the table object, we should define the mappings between the class attributes and the table fields.
In this simple example we use a DirectMapping, which is a class of
mapping that takes the value in the column and assigns it to the attribute,
and vice versa.
Here is the definition of the mapping between the class and the table.
GlorpBookDescriptorSystem >> descriptorForPerson: aDescriptor
	| table |
	table := self tableNamed: 'PERSON'.
	aDescriptor table: table.
	aDescriptor directMappingFor: #id.
	(aDescriptor newMapping: DirectMapping)
		from: #firstName
		to: (table fieldNamed: 'firstName').
	(aDescriptor newMapping: DirectMapping)
		from: #lastName
		to: (table fieldNamed: 'lastName').
	(aDescriptor newMapping: DirectMapping)
		from: #birthDate
		to: (table fieldNamed: 'birthDate')
In the above method we can see how the the descriptor links the class attribute to the field name.
Although this is verbose and the advantages may not be visible in this simple example, here lies the power of the Glorp orthogonal descriptor system, you describe everything and then link all the parts the way you want without modifying your domain object.
Creating tables
Assuming we haven't created the database tables externally, Glorp's metamodel
allows you to perform DDL (Data Definition Language) commands such as
CREATE TABLE or CREATE CONSTRAINT (among others) using plain
Pharo objects, and it can even determine when to run those.
To do that we must first connect to the database. We will explain how to do so in the following sections.
We will be using a PostgreSQL server running on the same host as our Pharo image. We will then create the Login object and a DatabaseAccessor for it to interact with the database.
Database Accessor
Glorp is programmed to be agnostic of the Smalltalk dialect and
database driver. To achieve that instead of talking directly to the
driver it uses an adapter object that acts as an intermediary between
Glorp and the underlying driver. Each database driver requires its
own subclass of DatabaseAccessor.
We use the recommended accessor, which is the Garage accessor that is compatible with all the drivers supported by the library.
To define it as the default driver we must execute once the following expression:
"Run this once"
GAGlorpDriver beGlorpDefaultDriver.
When using P3, this is not necessary, instead execute:
PharoDatabaseAccessor DefaultDriver: P3DatabaseDriver.Login
All the information necessary to connect to the database is defined in an instance of the
Login class. It is an abstraction for the connection parameters
used to connect to the database server, like the Plaform used,
hostname, port, username, password, database name and other parameters.
Here is a login creation:
login := Login new
	database: PostgreSQLPlatform new;
	username: 'postgres';
	password: 'secret';
	host: 'localhost';
	port: '5432';
	databaseName: 'glorpbook'.
The database accessor requires an instance of the class Login to establish a connection
to the database server specified in the login, using the platform specified.
accessor := DatabaseAccessor forLogin: login.
accessor login.
You can make the Login secure by making its password volatile, so
once the password was accessed the instance variable will be set to nil and
the secret won't be stored in the image anymore. Note that if you want to
use the same login instance for other connections, you must assign the
password string again.
Here we declare a secure Login
login secure: trueVerifying the connectivity.
If everything goes fine, then executing accessor isLoggedIn should answer
true.
accessor isLoggedIn
>>> true
Another way to test it is performing a basic query like the following
(accessor basicExecuteSQLString: 'SELECT 3+4') contents first first should
return 7 as the result; and yes, the contents first first is dirty,
but it is not meant to be used this way, we're doing it just to quickly verify that everything is working.
Session object
Once we're able to connect to the database we can start interacting with it using
Glorp's objects. We will do that using an object that orchestrates
all the other objects, the GlorpSession. The easiest way to get a
session is to ask the DescriptorSystem passing the Login instance
instance as the argument.
Here is how we access a session
session := GlorpBookDescriptorSystem sessionForLogin: login.
session login.
How the Parts Play Together
Let us look into the implementation of the method DescriptorSystem>>sessionForLogin: to understand
better how the parts interact.
DescriptorSystem class >> sessionForLogin: aGlorpLogin
	| system session |
	system := self forPlatform: aGlorpLogin database.
	session := GlorpSession new.
	session accessor: (DatabaseAccessor forLogin: aGlorpLogin).
	session system: system.
	^ session
First we get a system instantiating the receiver (in our case
GlorpBookDescriptorSystem) passing the platform as argument.
The platform in the system is important because it will be used to
generate SQL code using its particular syntax and data types.
Then we instantiate a GlorpSession and store it in the session object.
This session object is assigned a DatabaseAccessor. It uses this
accessor to communicate to the database, hence the name, but to know what to
send to the db it needs all the metadata defined in the system object
defined before.
Note we ask the abstract DatabaseAccessor class to return a concrete
instance for aGlorpLogin, it will return an instance of the
database accessor configured as default.
About the Platform.
In Glorp terminology a Platform is the RDBMS (for Relational Database
Management System) platform itself. The abstract class DatabasePlatform defines the
abstract methods to deal with differences of supported data types,
test the support of certain features, and so on.
In Pharo we have
MySQLPlatform, OraclePlatform, PostgresPlatform, SQLServerPlatform, SQLite3Platform and UDBCSQLite3Platform
as subclass of DatabasePlatform.
Saving/Updating/Deleting Objects
It is time to put to work all the classes and schema we just created. To do it
we will create and persist a few instances of our example class Person, and
then read some of them back. We'll explain a little bit
how Glorp decides what and when to INSERT, UPDATE or DELETE an object using
the concept of Unit of Work. But we should create the required tables first.
Creating Tables
Now we have our working session object, we can perform our DDL queries extracting the data from the system and sending commands to the accessor. But before we should execute the following to create the tables:
session createTablesAnd voilà, it will send the required commands to the database to create our tables, sequences, constraints and so on.
Unit of Work and Transactions
If you worked with RDBMS's before, you know you can use transactions that detach you from immediate writes to the database files, and enable you to rollback (undo) your changes, or do a batch of changes and commit them all at once.
Glorp provides you with automatic handling of such database transactions. It also adds another concept, the Unit of work (aka UOW or UnitOfWork). This UnitOfWork keeps track of all the persisted objects, enabling you to commit or rollback changes at the object level while maintaining the database transaction in sync with it.
Saving New Instances
To save instances, we should send the message register: anInstance to a session.
Note that this operation should occur within a Unit of Work using the message
inUnitOfWorkDo: as follows:
session inUnitOfWorkDo: [
	{
		(Person new
			firstName: 'John'; lastName: 'Locke';
			birthDate: '1704-08-29' asDate).
		(Person new
			firstName: 'John'; lastName: 'Malkovich';
			birthDate: '1953-12-09' asDate).
		(Person new
			firstName: 'George'; lastName: 'Lucas';
			birthDate: '1944-05-14' asDate)
	} do: [ :each | session register: each ]
].
As you can see, we didn't say if the instance needs to be inserted or updated, nor did we specify an id for each instance. The framework will determine that by registering the instance in the all-mighty session.
Note that if we are registering an object that was read in a previous unit of work, the object cannot be modified prior to registration in the current unit of work.
Reading instances
We can now read back some of the persisted instances. Again we use
the session object, sending it the message read: and the class as argument.
This will return a collection of results.
The following expression returns all read all instances of Person:
session read: PersonOf course you don't always read all the instances from the database but want to filter the results. For that you can pass a block that will act as a filter.
The following expression reads all instances of Person matching a criteria
session
	read: Person
	where: [:each | each firstName = 'John'].
Reading one instance
Another convenient way to retrieve a single instance instead of a Collection
is to use the readOneOf: or readOneOf:where: message in an analogous
way to read: and read:where:.
About blocks
The read:where: message might lead you to think you can pass any block to filter the results
as you can do with select: in a regular collection, but that is not the case.
Glorp uses blocks as a very clever way to build expressions that are later converted to SQL by the framework. You can do basic filtering using this feature, but keep in mind it doesn't work as a regular block.
Translated selectors
Next to regular operators such as = and >=, you can use some special selectors
that get translated to their counterparts SQL operators.
For instance the similarTo: selector gets converted to SQL's LIKE
operator.
With this we can retrieve all the Persons with a given last name using an operator that gets translated:
session
	read: Person
	where: [:each | each lastName similarTo: 'Malk%'].
Object update
We can also update one instance, i.e., to read one and update it. We do it
in the context of a UnitOfWork using the message inUnitOfWorkDo:.
Updating an object read within a UnitOfWork:
session inUnitOfWorkDo: [
	| person |
	person := session
		readOneOf: Person
		where: [:each | each lastName = 'Locke'].
	person birthDate: Date today.
	].
Note that to update an object accessed from the database does not require you to
send the message register: to the session object,
as we did while populating the table.
This is because when you're working inside a Unit of Work all the objects you read are automatically registered by the session, saving you from explicitly registering them (which is safe to do anyway, but it is not required).
Object deletion
So far we covered Creation, Read, and Update. We're only missing the Deletion of
objects. This is as easy as it gets, just send the delete: to the session
object with the object you want to delete as argument.
The following snippet show how to delete an object inside of a UnitOfWork:
session inUnitOfWorkDo: [
	| person |
	person := session
		readOneOf: Person
		where: [:each | each lastName = 'Locke'].
	session delete: person
	].
Another way to delete objects is passing a condition block:
session inUnitOfWorkDo: [
	session
		delete: Person
		where: [:each | each lastName = 'Locke'].
	].
You can delete an object without being inside of a UnitOfWork, this will cause the object to be deleted right away, without giving you the option to rollback such action unless you handle the transaction manually.
Transactions
Glorp lets you handle transactions automatically using a unit of work or manually as we will now show.
Rolling back changes
Atomic modifications to a database are important, and to achieve that you need transactions that let you rollback changes if something fails.
A Unit of Work handles the errors and other unexpected terminations of the block, so if something fails, it not only rollbacks any changes at the database level if necessary, but also, and more importantly it reverts the changes in your objects.
The following example shows that the last name of the Locke object will not be modified and the database updated since the unit of work failed.
session inUnitOfWorkDo: [
	person := session
		readOneOf: Person
		where: [:each | each lastName = 'Locke'].
	person lastName: 'Wayne'.
	Error signal: 'This error will abort the Unit Of Work.'
	]
Manually managing transaction
The inUnitOfWorkDo: message is a convenient way to isolate a block of execution
within the context of a transaction at both object and database levels. However
it has some limitations, like not being able to handle nested UnitOfWorks
or transactions. Everything happens in the context of the outer context transaction
in which it was evaluated.
If for some reason you need to handle the start/end/rollback of the unit of work manually, you can do so by using the following messages:
beginUnitOfWorkcommitUnitOfWorkrollbackUnitOfWorkcommitUnitOfWorkAndContinue
The first three have self-describing selectors, and can be used like in the following code snippet.
person := session
	readOneOf: Person
	where: [:each | each firstName = 'George'].
session beginUnitOfWork.
session delete: person.
session rollbackUnitOfWork.
session beginUnitOfWork.
person lastName: 'Lukas'.
session register: person.
session commitUnitOfWork.
The message commitUnitOfWorkAndContinue needs some explanation,
but the concept is simple: It commits the current unit of work, and then
creates a new one migrating all the objects registered in the commited unit of
work to the newly created, and still open, unit of work. If this paragraph
confuses you, looking at its implementation might explain it better.
It is useful for cases like batch loads or updates, where you want to commit changes every n instances or similar.
Commiting and continuing the Unit Of Work:
session beginUnitOfWork.
10 to: 99 do: [ :index |
	session register: (
	Person new
		firstName: 'Sample';
		lastName: index printString).
	(index \\ 10) isZero ifTrue: [
		session commitUnitOfWorkAndContinue
	].
].
session commitUnitOfWork.
We can cleanup (delete) some sample instances by running:
session inUnitOfWorkDo: [
		session
			delete: Person
			where: [:each | each firstName = 'Sample'].
].
Glorp Configurations and Additional Concepts
In our previous example we created a simple class that mapped 1:1 with a table using simple data types, but Glorp provides many more features than an ActiveRecord like mapping. It lets you fine tune the persistence of your classes. We will go over the different configurations of class models, table data types and constraints and mappings of all sorts.
Class models
A class model defines the attributes of your domain objects, and how they
compose. Each of your persisted objects should have an instance of
GlorpClassModel in the descriptor system containing all the
attributes of your class. By convention, these attributes are added by
implementing classModelForYourClass: as we did previously for the Person example.
The simplest way to add an attribute is using a series of convenience methods returning instances of GlorpAttributeModel,
described below:
newAttributeNamed: #email- Used to define simple scalar/literal values such as Numbers, Strings, Dates, etc.
newAttributeNamed: #address type: Address- Used to define 1:1 (one to one) relations with other objects of your domain model.
newAttributeNamed: #invoices collectionOf: Invoice- Used to define 1:n (one to many) and n:m (many to many) relations of your class model with other models.
newAttributeNamed: #invoices collection: collectionClass of: Invoice- Similar as the one above for 1:n and n:m relations, but you can define what kind of Collection is going to be used.
newAttributeNamed: #counters dictionaryFrom: keyClass to: valueClass- Used to define an attribute that is a Dictionary where the key is
keyClassand its values are instances ofvalueClass.
Attribute properties
The above described methods return instances of GlorpAttributeModel, which
share common properties that you can configure using the following messages.
useDirectAccess: aBoolean- Let you define whether the access to the attribute described by the symbol of your domain model will be performed by directly accessing the instance variable (slot) instead of using a message send. This is the default, and lets you persist variables that don't have getters and setters. It's also useful where the getters and setters
have extra behavior that you don't want triggered by the persistence mechanisms. On the other hand, going through a message send allows you to persist things that don't correspond directly to a single instance variable.
beForPseudoVariable- Useful for cases where you want to describe an attribute that won't be read nor written, but still described to be used on queries.
For example, in a later section we talk about mapping the position of an object in a collection to a field in the database, since databases don't maintain order. We could map that order field to a pseudo-variable and use it in queries, even though we don't want it stored in the object.
GlorpBookDescriptorSystem >> classModelForPerson: aClassModel
	(aClassModel newAttributeNamed: #id) useDirectAccess: true.
	aClassModel newAttributeNamed: #firstName.
	aClassModel newAttributeNamed: #lastName.
	aClassModel newAttributeNamed: #birthDate.
	aClassModel newAttributeNamed: #email.
	aClassModel newAttributeNamed: #address type: Address.
	aClassModel newAttributeNamed: #invoices collectionOf: Invoice.
	aClassModel newAttributeNamed: #counters from: String to: Integer.
Table model
Glorp also models your database objects, such as tables, constraints, indexes, etc.. With this model it will be able to determine how to serialize the objects to SQL, how to perform joins to retrieve 1:1 or 1:n relations, and so on.
The descriptor system follows a convention to define the tables,
it uses the tableForTABLENAME: selector to configure TABLENAME, the
argument of this method is an instance of DatabaseTable, and this
method is responsible for describing your table in the relational
database, including field names and their data types, contraints (primary keys
and/or foreign keys), etc.
Adding fields to the table
Let's bring back our example from the beginning of this book
GlorpBookDescriptorSystem >> tableForPERSON: aTable
	(aTable createFieldNamed: 'id' type: platform serial) bePrimaryKey.
	aTable createFieldNamed: 'firstName' type: (platform varChar: 100).
	aTable createFieldNamed: 'lastName' type: (platform varChar: 100).
	aTable createFieldNamed: 'birthDate' type: platform date.
As you can see, you can add a field by sending createFieldNamed:type: to
the table object. The first argument of the method is name of the field
(aka column) in your table, the second one is the datatype.
For the datatype we're not specifying any particular implementation of the type but instead we send a message to the platform object, and in Glorp jargon the platform is the RDBMS we'll be using.
Doing it this way enables our table model to be RDBMS agnostic, and, for instance,
it will work with SQLite or PostgreSQL (or any other platform).
E.g. if our platform is PostgreSQL then platform varchar will return
VARCHAR, but if instead our platform is SQLite then it will return TEXT
because SQLite only supports TEXT as datatype for character based fields.
Going back to createFieldNamed:type:, it will return an instance of
DatabaseField, which has properties of its own, such as if the field is
nullable, unique, its default value, and some convenience methods such
as bePrimaryKey which will create a PK (primary key) on the table
for this field.
Commonly used datatypes in alphabetic order are:
| selector | SQL-92 datatype | Pharo class |
| blob | BLOB | ByteArray |
| boolean | BOOLEAN | Boolean |
| date | DATE | Date |
| decimal | NUMERIC | ScaledDecimal |
| double | DOUBLE | Float |
| float | REAL | Float |
| integer | INTEGER | Integer |
| serial | SERIAL | Integer |
| time | TIME | Time |
| timestamp | TIMESTAMP | DateAndTime |
| varchar | VARCHAR | String |
You can find more datatypes by browsing the types method category of
DatabasePlatform or any of its subclasses, not all databases support all
datatypes, and some platforms have their own datatype. If you decide to use
a datatype that's only supported by a particular RDBMS you will lose the
benefits of being platform agnostic, so it is a tradeoff.
Mappings (aka Descriptor)
Once we have the Class Model describing our business objects and the
Table Models describing the tables where they will be stored, we need to
describe how they are going to work together. To achieve that Glorp uses
an instance of Descriptor that contains the mappings between the attributes
of the class model and the fields of the tables involved.
As expected, there is a convention to define Descriptors and, you guessed right,
it is descriptorForYourClass: that will receive as an argument a
instance of Descriptor on which you will configure the mappings.
GlorpBookDescriptorSystem >> descriptorForPerson: aDescriptor
	| table |
	table := self tableNamed: 'PERSON'.
	(aDescriptor newMapping: DirectMapping) from: #id to: (table fieldNamed: 'id').
	(aDescriptor newMapping: DirectMapping) from: #firstName to: (table fieldNamed: 'firstname').
	"snip..."
	(aDescriptor newMapping: OneToOneMapping) attributeName: #address.
	(aDescriptor newMapping: ToManyMapping) attributeName: #invoices.
As you can see, the usual practice is to get a reference to the tables involved
(one in this example, could be more), and then add mappings to
aDescriptor by sending it the message newMapping: with an instance of
the class of mapping we want to use.
There are many mappings that Glorp provides, but the most used ones are:
Direct mapping.
To map a number, a string, a date or any other value like object
you use an instance of DirectMapping, specifying which attribute from
your class model you want to map to a field of a table.
Although many times they will be the same symbol, the argument you pass to
the from: parameter is not the symbol of the selector
but instead the name of attribute you have defined in your classModelFor...:
method.
1:1 relationships.
When you're trying to map a single reference from one object to another,
you use the class OneToOneMapping and specify the name of the attribute
that this instance is mapping. If everything is as simple as this you don't
have to specify further instructions and Glorp will determine how to retrieve
the instances based on the information provided in the ClassModel, foreign keys,
etc. If you need further instructions you can always define them, more on that later.
1:N relationships.
If you are trying to map a collection that belongs to a parent/owner object
like the invoices of a Person or the items of such invoice to the invoice itself,
then you have to use the OneToManyMapping class.
It is commonly used when you have the rows of the tables at the N side of
the relation have a field that points back to the the 1 side.
In our example, the invoices have a Foreign Key pointing back to the persons table.
N:M relationships.
The Many to Many relationships is similar to the previous one, but in this case
the other side of the relation might belong to more than one owner.
For instance, if you have Person and Tag, a Person might have many Tags,
but these tags in turn belong to other instances of Person.
In this case you use the ManyToManyMapping and also have to specify
the attributeName.
From your the Pharo point of view, you will continue to see a regular collection
but when storing its elements it will require a third table to do it, called
a link table, Glorp has a convention to name such link tables, and it is
based on composing the names of both sides of the relations.
Following our Person to Tag relation, the table name Glorp will expect is
TAG_ON_PERSON, and this must also have its definition in the descriptor system,
so in this case there must be a tableForTAG_ON_PERSON: method.
Common properties of relationship mappings
All OneToOneMapping, OneToManyMapping and ManyToManyMapping are
convenience subclasses of RelationshipMapping, and as such they share
common properties that can be modified.
For instance, the only difference between OneToManyMapping and
ManyToManyMapping is that the later is initialized to use a link table,
but you can have a OneToManyMapping that uses a link table if you prefer,
you simple send useLinkTable to it.
Reference Classes.
All RelationshipMapping instances can specify the class they reference
by sending referenceClass: with the desired class as argument. This is
used a lot, and is a convenience method that ends up modifying the attribute
in the ClassModel. So you can specify it at either place you find more
convenient.
Note we only define the class referenced, because the other side of the relationship is the class for which we're defining the mapping itself.
Other attribute common to all RelationshipMapping subclasses is that
you can specify how it is suppose to join with other tables, it is,
its Join object. More on this on the advanced section.
Exclusivity.
Another attribute is the exclusivity of relationships, enabled by sending
beExclusive to the mapping. This handy method makes that once the parent
(or left) side of the relation is deleted from the database, Glorp will
manually delete the child (or right) side of it.
In our Person example, if the relation with Address was exclusive,
then deleting a Person would cause Glorp to delete its address as well.
One caveat of this convenience approach, is that it doesn't play along with database
foreign key actions like ON DELETE CASCADE, basically because one will
happen without the other knowing it, and Glorp will try to delete an
exclusive object that was already removed from the database
by the CASCADE and because of that it will fail.
Collection type.
In the case of to many mappings you can specify the collection type
of the mapping, for instance, you can send collectionType: Set to your
mapping and have it initialized to a Set instead of the default OrderedCollection.
Proxy.
And last, but not least, you can specify whether to proxy or not such a relation.
By sending shouldProxy: either true or false, Glorp will
place proxies or immediately build an instance from the database. If you don't specify this, it will proxy by default.
A Word about Proxies.
To avoid reading the whole object graph every time you read an object that has any kind of relationship mapping, Glorp places a Proxy object instead of reading it from the database. This saves a lot of roundtrips to the database, bandwidth and CPU/memory in the image building objects that you may not ever use.
However, there are cases when you know that certain objects reference other objects that you know that always will be used, if that is the case you can avoid the proxying, and instead force the immediate materialization.
Once Glorp turns a proxy into one of your domain objects, it will store your object in the Session Cache (more on this later), so future references to the same object won't cause an additional read from the database, and instead use the instance in the cache.
And also, Proxies are tricky animals, so beware when debugging something that involves them. Sometimes they can fool the development tools, making them believe they're something they're not!
Extending our Basic Example
Now that we explained in more detail the main parts of Glorp's descriptor system, we're ready to extend our basic example, we're going to create a minimal invoicing model to include the concepts just learnt.
We will
- define new Pharo class
- describe such new classes to be handled by Glorp
- describe the table in which such class instances will be stored
- describe the mapping between the instances and the records.
Domain classes
To do so we will create the following classes Person,
Address, Invoice, InvoiceItem, all inheriting from
GlorpBookObject, as a convenience to factor the id attribute.
We will omit the listing of accessor methods, but you should create them. Regarding the id attribute, Glorp doesn't require you to use it as the primary key of your objects.
You can use as many attributes as you want, but for the sake of simplicity we will use it as a surrogate key, which is a key that is a unique identifier, an object not derived from application data.
Here is the hierarchy root of book classes.
Object subclass: #GlorpBookObject
	instanceVariableNames: 'id'
	classVariableNames: ''
	package: 'Glorp-Book'.
GlorpBookObject subclass: #Person
instanceVariableNames: 'firstName lastName birthDate addresses invoices tags'
classVariableNames: ''
package: 'Glorp-Book'.GlorpBookObject subclass: #Address
instanceVariableNames: 'street number city zip'
classVariableNames: ''
package: 'Glorp-Book'.GlorpBookObject subclass: #Invoice
instanceVariableNames: 'issueDate person address items'
classVariableNames: ''
package: 'Glorp-Book'.GlorpBookObject subclass: #InvoiceItem
instanceVariableNames: 'invoice description price'
classVariableNames: ''
package: 'Glorp-Book'.Aside from the accessors, when you're dealing with collections (to-many relations) that are going to persisted, it is recommended to early initialize all the instance variables that will reference such collections. Otherwise it could cause some failures because Glorp keeps a copy of the object attributes to enable rolling back changes on memory. Plus... having a complete instance is a good practice too.
Person >> initialize
	super initialize.
	addresses := OrderedCollection new.
	invoices := OrderedCollection new.
Invoice >> initialize
super initialize.
items := OrderedCollection new.Class Model Declarations
Let's create our GlorpBookDescriptorSystem to describe the new
domain models.
GlorpBookDescriptorSystem >> classModelForPerson: aClassModel
	(aClassModel newAttributeNamed: #id) useDirectAccess: true.
	aClassModel newAttributeNamed: #firstName.
	aClassModel newAttributeNamed: #lastName.
	aClassModel newAttributeNamed: #email.
	aClassModel newAttributeNamed: #addresses collectionOf: Address.
	aClassModel newAttributeNamed: #invoices collectionOf: Invoice.
GlorpBookDescriptorSystem >> classModelForAddress: aClassModel
(aClassModel newAttributeNamed: #id) useDirectAccess: true.
aClassModel newAttributeNamed: #street.
aClassModel newAttributeNamed: #zipGlorpBookDescriptorSystem >> classModelForInvoice: aClassModel
(aClassModel newAttributeNamed: #id) useDirectAccess: true.
aClassModel newAttributeNamed: #issueDate.
aClassModel newAttributeNamed: #person type: Person.
aClassModel newAttributeNamed: #address type: Address.
aClassModel newAttributeNamed: #items collectionOf: InvoiceItemGlorpBookDescriptorSystem >> classModelForInvoiceItem: aClassModel
(aClassModel newAttributeNamed: #id) useDirectAccess: true.
aClassModel newAttributeNamed: #invoice type: Invoice.
aClassModel newAttributeNamed: #description.
aClassModel newAttributeNamed: #priceTable Declarations
Then we should declare the tables that represent our domain.
Here is the table models for the class Person, Address and Invoice.
GlorpBookDescriptorSystem >> tableForPERSON: aTable
	(aTable createFieldNamed: 'id' type: platform serial) bePrimaryKey.
	aTable createFieldNamed: 'firstName' type: (platform varChar: 100).
	aTable createFieldNamed: 'lastName' type: (platform varChar: 100).
	aTable createFieldNamed: 'email' type: (platform varchar: 200).
GlorpBookDescriptorSystem >> tableForADDRESS: aTable
(aTable createFieldNamed: 'id' type: platform serial) bePrimaryKey.
aTable createFieldNamed: 'street' type: (platform varChar: 100).
aTable createFieldNamed: 'zip' type: platform integer.GlorpBookDescriptorSystem >> tableForINVOICE: aTable
| personField addressField |
(aTable createFieldNamed: 'id' type: platform serial)
bePrimaryKey.
aTable createFieldNamed: 'issueDate' type: platform date.
personField := aTable
createFieldNamed: 'person_id'
type: platform integer.
addressField := aTable
createFieldNamed: 'address_id'
type: platform integer.
aTable
addForeignKeyFrom: personField
to: ((self tableNamed: 'PERSON') fieldNamed: 'id').
aTable
addForeignKeyFrom: addressField
to: ((self tableNamed: 'ADDRESS') fieldNamed: 'id').
As you can see in our INVOICE table, we not only added fields, but also
added Foreign Keys (aka FK)
to our table table model using the message addForeignKeyFrom:to:.
This will add the foreign keys to the list of constraints of the table model, and will be used by Glorp to order writes/deletions and
infer relations.
Also notice that we need to pass the referenced field as argument.
To obtain it we ask the descriptor system for the table of PERSON
and ADDRESS by sending tableNamed: with the name of table we want
as argument. This will return the DatabaseTable with that name,
and to this object we will ask for the field named id.
GlorpBookDescriptorSystem >> tableForINVOICEITEM: aTable
	| invoiceField |
	(aTable createFieldNamed: 'id' type: platform serial) bePrimaryKey.
	invoiceField := aTable createFieldNamed: 'invoice_id' type: platform serial.
	aTable createFieldNamed: 'description' type: (platform varchar: 150).
	aTable createFieldNamed: 'price' type: platform decimal.
	aTable createFieldNamed: 'position' type: platform integer.
	aTable
		addForeignKeyFrom: invoiceField
		to: ((self tableNamed: 'INVOICE') fieldNamed: 'id').
GlorpBookDescriptorSystem >> tableForPERSON_ON_ADDRESS: aTable
| personField addressField |
personField := aTable
createFieldNamed: 'person_id'
type: platform integer.
addressField := aTable
createFieldNamed: 'address_id'
type: platform integer.
personField bePrimaryKey.
addressField bePrimaryKey.
aTable
addForeignKeyFrom: personField
to: ((self tableNamed: 'PERSON') fieldNamed: 'id').
aTable
addForeignKeyFrom: addressField
to: ((self tableNamed: 'ADDRESS') fieldNamed: 'id').
As you can see in the last method, we created a table model for the table
PERSON_ON_ADDRESS. This table will be used as a link table. Because
this link table references to other tables we also created Foreign Keys
from each reference field using the same approach described before.
Mapping declarations
Address
The mapping for the class and table address is simple since there is a direct mapping between the class model (the domain model) and the table.
GlorpBookDescriptorSystem >> descriptorForAddress: aDescriptor
	| table |
	table := self tableNamed: 'ADDRESS'.
	aDescriptor table: table.
	(aDescriptor newMapping: DirectMapping)
		from: #id
		to: (table fieldNamed: 'id').
	(aDescriptor newMapping: DirectMapping)
		from: #street
		to: (table fieldNamed: 'street').
	(aDescriptor newMapping: DirectMapping)
		from: #city
		to: (table fieldNamed: 'zip').
Invoice
The mapping for invoice is a bit more elaborated, because it not only
contains Direct Mappings, and one-to-one mappings for the Person and
Address, but also contains a one-to-many relationship to its items.
We introduced the orderBy: and writeTheOrderField attributes in
the #items mappings. You can use the first attribute independently or both together.
The orderBy: attribute instructs
Glorp to read the elements from the database and order (aka sort) them
by the field described in the block. This is useful so the collection that holds
the references to the items (in this example) is always sorted the same way,
because the order the rows come from the database is not always the same,
and you can't trust they will return in the same order as they were written.
The writeTheOrderField command will make Glorp save the index of the
element in the collection as a field in the row. It will use the field defined
in orderBy: as its target, in this case position. So if you have an
OrderedCollection with five items, the first element one will have 1 stored
in the position field, the second 2, and so on. If you change the order
of the elements in the collection, the position field will be saved with the
new index.
GlorpBookDescriptorSystem >> descriptorForInvoice: aDescriptor
	| table |
	table := self tableNamed: 'INVOICE'.
	aDescriptor table: table.
	(aDescriptor newMapping: DirectMapping)
		from: #id
		to: (table fieldNamed: 'id').
	(aDescriptor newMapping: DirectMapping)
		from: #issueDate
		to: (table fieldNamed: 'issueDate').
	(aDescriptor newMapping: OneToOneMapping)
		attributeName: #person.
	(aDescriptor newMapping: OneToOneMapping)
		attributeName: #address.
	(aDescriptor newMapping: ToManyMapping)
		attributeName: #items;
		orderBy: [:each |
			(each getTable: 'INVOICEITEM') getField: 'position'];
		writeTheOrderField.
InvoiceItem
The mapping for each invoice item is slightly different since an item is always
part of an Invoice, and only that invoice; so because of that we have a
OneToOneMapping referencing its invoice. This way we make the relation
between Invoice and InvoiceItem bidirectional.
GlorpBookDescriptorSystem >> descriptorForInvoiceItem: aDescriptor
	| table |
	table := self tableNamed: 'INVOICEITEM'.
	aDescriptor table: table.
	(aDescriptor newMapping: DirectMapping)
		from: #id
		to: (table fieldNamed: 'id').
	(aDescriptor newMapping: DirectMapping)
		from: #description
		to: (table fieldNamed: 'description').
	(aDescriptor newMapping: DirectMapping)
		from: #price
		to: (table fieldNamed: 'price').
	(aDescriptor newMapping: OneToOneMapping)
		attributeName: #invoice.
Person
The mapping for the class Person is more elaborate and worth some explanation of what happens in the last lines.
GlorpBookDescriptorSystem >> descriptorForPerson: aDescriptor
	| table linkTable |
	table := self tableNamed: 'PERSON'.
	aDescriptor table: table.
	(aDescriptor newMapping: DirectMapping)
		from: #id
		to: (table fieldNamed: 'id').
	(aDescriptor newMapping: DirectMapping)
		from: #firstName
		to: (table fieldNamed: 'firstName').
	(aDescriptor newMapping: DirectMapping)
		from: #lastName
		to: (table fieldNamed: 'lastName').
	(aDescriptor newMapping: DirectMapping)
		from: #email
		to: (table fieldNamed: 'email').

	(aDescriptor newMapping: ToManyMapping)
		attributeName: #invoices;
		orderBy: [:each |
			(each getTable: 'INVOICE') getField: 'issueDate'].

	linkTable := self tableNamed: 'PERSON_ON_ADDRESS'.
	(aDescriptor newMapping: ManyToManyMapping)
		attributeName: #addresses;
		referenceClass: Address;
		beExclusive;
		join: (Join
			from: (table fieldNamed: 'id')
			to: (linkTable fieldNamed: 'person_id')).
Here we introduce the explicit join: attribute of the Reference Mapping.
Usually Glorp infers and creates such Join by looking at the Foreign Keys
of the described or referenced class, but you can make that Join explicit,
you just have to create a Join object with the source field and the
referenced field as arguments. In this case the join is pretty straightforward
and between two fields, but it could be between as many fields as you want.
Sample data
We will create some sample data for our example, and for the Persons we will save three instances named after famous Smalltalkers, with random addresses, so don't mail them.
session inUnitOfWorkDo: [
	| lastnames firstnames |
	{ 'Dan'. 'Alan'. 'Adele' }
		with: {'Ingalls'. 'Kay'. 'Goldberg'}
		do: [ :firstName :lastName |
			| person |
			person := (Person new
				firstName: firstName;
				lastName: lastName).
			person addresses add: (
				Address new
					street: (1 to: 1000) atRandom printString
					, ' Random Avenue';
					zip: (1000 to: 9000 by: 100) atRandom;
					yourself).
			session register: person
	]
].
Now we created the sample Persons, let's add an extra address for Alan.
session inUnitOfWorkDo: [
	| alan |
	alan := session
		readOneOf: Person
		where: [ :each | each firstName = 'Alan' ].
	alan addresses
		add: (Address new
			street: '1025 Westwood Blv, 2nd Floor, Los Angeles, CA';
			zip: 90024;
			yourself)
].
As you can see, we didn't have to register the newly created address because the Person was read inside of a UnitOfWork. If we read the instance again and inspect its addresses we will find the new instance is there.
(session
	readOneOf: Person
	where: [ :each | each firstName = 'Alan' ]) addresses inspect
Before continuing and to make code simpler and more readable we'll create a few convenience methods:
InvoiceItem class >> description: aString price: aNumber
	^ self new
			description: aString;
			price: aNumber;
			yourself
Invoice >> addItem: anInvoiceItem
anInvoiceItem invoice: self.
self items add: anInvoiceItemInvoice >> totalPrice
^ self items sum: #priceWe can now procceed to create an few instances of Invoice. Let's create one invoice for each person in the database with two items describing donations to the Pharo Consortium and Association with randomized amounts (within a certain range) for each one.
session inUnitOfWorkDo: [
	(session read: Person) do: [:person |
		| invoice |
		invoice := Invoice new
			issueDate: Date today;
			person: person;
			address: person addresses atRandom.
		invoice
			addItem: (InvoiceItem
				description: 'Pharo Consortium donation'
		price: (1000s to: 4000s by: 1000s) atRandom);
			addItem: (InvoiceItem
				description: 'Pharo Association donation'
		price: (20s to: 100s by: 10s) atRandom); yourself.
		session register: invoice.
	]
].
As usual, you can read the Invoices by doing session read: Invoice, let's
print how much each Person donated.
(session read: Invoice) do: [:each |
	Transcript
		show: each person firstName, ' ', each person lastName;
		show: ': ', each totalPrice printString;
		cr.
]
When we presented the ReferenceMappings we mentioned how Glorp puts proxies in place of a referenced object to avoid performing unnecessary roundtrips to the database.
In the example above, assuming all caches are empty, Glorp will perform one query to retrieve all the Invoices and then one extra query to retrieve the data to instantiate each Person. So if you retrieve Invoices for three different persons, Glorp will perform four queries, it is four roundtrips, to the database. Keep that in mind while we continue with other examples.
(session read: Invoice) sum: #totalPrice
The message sum: above will retrieve all the rows from the tables,
instantiate an equivalent quantity of Invoice and then go over all
the invoices' items to sum them. In our example, we only have a few instances
but what if we had a million of them? Instantiating everything at the Pharo
side wouldn't be convenient for such a simple sum. Performing an SQL SUM()
at the database side would be more efficient, since we would only retrieve
the total instead. But how to do such a query?
The Query object
So far we've been querying objects by means of sending read: or
read:where: to the session object, but if you want to perform
a particular query, like limiting the number of results, running an aggregate
function like SUM(), AVG(), ordering the rows at the server side,
performing subqueries and many other features then the session object
doesn't provide you with an API for that.
The read: message
Everytime you sent a read: message to the session, the session created a
simple Query object to read the class passed as parameter as in the following expression.
(session read: Invoice) executeIn: session
But you can instantiate a Query object independently, configure it to fit your needs and
execute it in the session. Enter the Query object!
SimpleQuery
Let's say we want to know the sum of all the prices of our InvoiceItems,
we can do that by using the retrieve: method and using an aggregate function
like sum.
((SimpleQuery read: InvoiceItem)
	readsOneObject: true;
	retrieve: [:each | each price sum ]) executeIn: session.
The retrieve: method configures the query to return only the retrieved attributes
of the read object. The query will return a collection with the objects
retrieved instead of a collection of instances of the read class.
If we know beforehand that our query will return a single row with a single
field, i.e., a single object, we can configure the query to return that
object directly by setting readsOneObject: to true.
If you retrieve more than one object then the query will return a collection of collections, in the form of #(#(...) #(...) ...).
((SimpleQuery read: Person)
	retrieve: [:each | each firstName ];
	retrieve: [:each | each lastName]) executeIn: session.
Attributes of queries
The Query object models an SQL SELECT statement, and like that statement
it can include a WHERE, ORDER BY, GROUP BY, HAVING, etc.
WHERE expression
You can always include a where expression as you did when reading through the session object. Inside the where expression, you can filter by attributes of referenced objects.
((SimpleQuery read: Invoice)
	where: [:each | each person lastName = 'Goldberg' ]
	) executeIn: session
Or even by interacting with a referenced collection, i.e., retrieving only Invoices containing items with a price above 2000.
((SimpleQuery read: Invoice)
	where: [:invoice |
		invoice items anySatisfy: [ :item |
			item price > 2000 ]]) executeIn: session
ORDER BY expression
The ORDER BY expression in a Query object is set by sending orderBy: to
the query object as many times, as fields you want to include in your ordering
criteria.
((SimpleQuery read: InvoiceItem)
	orderBy: [:each | each price descending];
	orderBy: [:each | each invoice person lastName]
	) executeIn: session
GROUP BY expression
As shown in previous code samples you can also perform SQL's aggregate
queries like SUM(), COUNT(), etc.; if you want to perform those
aggregate functions grouped by certain expression, then the groupBy:
option comes to the rescue.
((SimpleQuery read: InvoiceItem)
	retrieve: [ :e |
	 	e invoice person firstName, '-', e invoice person lastName];
	retrieve: [ :e | e price sum ];
	groupBy: [ :e |
		e invoice person firstName, '-', e invoice person lastName]
	) executeIn: session.
In the above example you can see we're retrieving two fields concatenated and grouped by the same concatenated value. Remember that when using an aggregate function, all the non-aggregated fields retrieved must be included in the GROUP BY. Notice here we're also grouping by a field in other table, Glorp resolves all the JOINs for you.
Retrieving the average donation
((SimpleQuery read: InvoiceItem)
	retrieve: [ :each | each description];
	retrieve: [ :each | each price average ];
	groupBy: [ :each | each description]) executeIn: session.
Although the GROUP BY expression is used extensively in production systems, it only works for retrieving fields of the query and not full-fledged instances of your objects described in your DescriptorSystem.
LIMIT and OFFSET expressions
You can also limit the number of rows returned by your Query, this is useful if you know your query will return one single row/object or if only want to retrieve a certain number of rows. The LIMIT expression varies between different databases, Glorp will make sure it generates the right SQL code for the plaform you're using.
When the LIMIT expression is used in combination with the OFFSET expression it lets you implement simple pagination queries.
((SimpleQuery read: InvoiceItem)
	limit: 3;
	offset: 3) executeIn: session.
Fetching referenced objects
We mentioned before that when you're querying the Invoices Glorp will place a Proxy object for each reference (e.g. Person) it doesn't have in the session cache, and then once the Proxy is hit by a message send it will materialize it by retrieving its contents by performing a database Query.
Imagine this scenario for at least 1000 Invoices that reference a different Person each, that would be 1001 queries and their resulting I/O impact.
In a regular SQL query you would solve that by doing a regular JOIN with the related table; when reading first class Objects with Glorp it makes it almost as easy as doing a JOIN in SQL.
((SimpleQuery read: Invoice)
	alsoFetch: [:each | each person ];
	alsoFetch: [:each | each address]) executeIn: session.
You can specify as many alsoFetch: references as you want, and Glorp
will knit all together by using JOIN expressions created from the Join
objects defined when configuring the reference mappings of the Class Descriptor.
If nothing else is added to the alsoFetch: expression block it will perform
INNER JOIN to knit the relations. If you're also fetching a
reference that might be nil then the whole object/row would be excluded
from the result. For instance, if an Invoice doesn't have an Address, then
with the above example that invoice would be left out by the JOIN.
You can save that by doing an OUTER JOIN on the field you're fetching
by simply adding asOuterJoin to the field.
Retrieving all at once with an OUTER JOIN
((SimpleQuery read: Invoice)
	alsoFetch: [:each | each person ];
	alsoFetch: [:each | each address asOuterJoin]) executeIn: session.
The alsoFetch: is a powerful feature, and can be used in combination with
all the above described Query attributes (except for GROUP BY).
Ensuring fresh data
Everytime you read an object inside a Glorp session, it will save it in the
session cache keyed by an object representing the Primary Key in your database,
in our example each ClassDescriptor will have a cache keyed by the id field,
which happens to be our Public Key in the tables.
This is great because, as any proper cache would, it avoids going outside of your image to retrieve something from the database, saving you from the extra roundtrips. However, when the objects are modified concurrently during the lifetime of your session, then you could end up with an old version of it, and even if you perform a new Query to the database Glorp will try to use the same object it had in the session Cache.
As you might expect by now, Glorp provides a way to override this and force
the update of the Cache with the newly read data. Just simply set
shouldRefresh: true, and this will tell Glorp to ignore any attempt
to read from the Cache and instead always use what is new.
((SimpleQuery read: Invoice) shouldRefresh: true) executeIn: session.Set operations
In addition to statements that affect the result set of the query,
you can perform
set operations
like UNION ALL, INTERSECT and EXCLUDE (aka subtract)
between your query and other queries.
((SimpleQuery read: InvoiceItem) except:
	(SimpleQuery read: InvoiceItem where: [:each | each price < 1000])
) executeIn: session.| SQL SET OPERATOR | Query selector | |
UNION ALL |
union: |
|
INTERSECT |
intersect: |
|
EXCLUDE |
minus: |
Conclusion
The SimpleQuery offers powerful logic and you should play with it to understand how to use it.
Handling inheritance
In this chapter we will look at how Glorp help us handling object of different subclasses.
When a class Parent has two subclasses LeftChild and
RightChild, a polymorphic query is one where we can query on the
Parent class and as a result get instances of Parent, LeftChild
and RightChild.
There are three common ways to support polymorphic queries with a relational database:
- A table for each class (abstract or not)
- A table for each concrete class
- One table for all classes
Glorp currently supports the two latest options. We will illustrate these two approaches now.
A table for each concrete class
In this approach each concrete class has its own table.
That table holds all the instance variables for the class.
As an example of this approach, let us imagine that the Parent class an abstract class.
Therefore, we need two tables, which we call LEFTCHILDTABLE and
RIGHTCHILDTABLE.
Class definitions
The class definitions are straightforward.
GlorpBookObject subclass: #Parent
	instanceVariableNames: 'top'
	classVariableNames: ''
	package: 'Glorp-Book'
Parent subclass: #LeftChild
instanceVariableNames: 'left'
classVariableNames: ''
package: 'Glorp-Book'Parent subclass: #LeftChild
instanceVariableNames: 'right'
classVariableNames: ''
package: 'Glorp-Book'System Description
We'll extend our System Descriptor to include the newly created classes.
Class model for LeftChild.
GlorpBookDescriptorSystem >> classModelForLeftChild: aClassModel
	aClassModel newAttributeNamed: #left.
	aClassModel newAttributeNamed: #top.
	aClassModel newAttributeNamed: #id.
Class model for RightChild.
GlorpBookDescriptorSystem >> classModelForRightChild: aClassModel
	aClassModel newAttributeNamed: #right.
	aClassModel newAttributeNamed: #top.
	aClassModel newAttributeNamed: #id
Describing the tables.
GlorpBookDescriptorSystem >> tableForLEFTCHILDTABLE: aTable
	(aTable createFieldNamed: 'left_value' type: (platform varChar: 50)).
	(aTable createFieldNamed: 'top' type: (platform varChar: 50)).
	(aTable createFieldNamed: 'id' type: (self sequenceTypeNamed: 'parent_seq'))
		bePrimaryKey.
GlorpBookDescriptorSystem >> tableForRIGHTCHILDTABLE: aTable
(aTable createFieldNamed: 'right_value' type: (platform varChar: 50)).
(aTable createFieldNamed: 'top' type: (platform varChar: 50)).
(aTable createFieldNamed: 'id' type: (self sequenceTypeNamed: 'parent_seq'))
bePrimaryKey.
We introduced sequenceTypeNamed:, that we didn't use before. When using
sequence or serial datatypes, Glorp will create a database sequence
for each table if required, but because we're using a type resolver
with inheritance, it is necessary that all the children classes that use
a serial datatype share the same sequence.
The message sequenceTypeNamed: lookups in the Descriptor System for an existing sequence with that name,
and if no one was registered before it will instantiate a new one with that name and register it for later use.
Handling inheritance
So far we created the class models for two classes, and a table model for each
one of them, but nothing involving inheritance. Notice we don't have to create a
class model for the Parent class, although we will have to create a
class descriptor for it.
GlorpBookDescriptorSystem >> descriptorForParent: aDescriptor
	(self typeResolverFor: Parent) register: aDescriptor abstract: true.
As you can see, we introduced a concept in the Class Descriptor that we never used, explicitly, before: a Type Resolver (or resolver for short).
Type resolver
Every Class Descriptor has a resolver that helps it determine which
class to instantiate. If Glorp doesn't find one explicitly defined, it
creates an IdentityTypeResolver for your class.
You can define the resolver for your class by implementing a method
named typeResolverForYourClass that returns an instance of TypeResolver.
We will create one for our class Parent
GlorpBookDescriptorSystem >> typeResolverForParent
	^ HorizontalTypeResolver forRootClass: Parent
There are different classes of resolvers:
- IdentityTypeResolver
- No inheritance
- HorizontalTypeResolver
- Each Class is persisted in a separate table
- FilteredTypeResolver
- All Classes are persisted in the same table
We chose the HorizontalTypeResolver because we're storing our instances
in separate tables. IdentityTypeResolver is the default one: it is for the case when there is no inheritance,
where you map a class to a single table, or more than one table but always for a single class.
and we will cover FilteredTypeResolver later.
what is IdentityTypeResolver
Each of the class descriptor methods register a resolver.
The method typeResolverFor: results in a call to typeResolverForParent.
GlorpBookDescriptorSystem >> descriptorForLeftChild: aDescriptor
	| leftTable |
	leftTable := self tableNamed: 'LEFTCHILDTABLE'.
	aDescriptor table: leftTable.
	(aDescriptor newMapping: DirectMapping)
		from: #id to: (leftTable fieldNamed: 'id').
	(aDescriptor newMapping: DirectMapping)
		from: #top to: (leftTable fieldNamed: 'top').
	(aDescriptor newMapping: DirectMapping)
		from: #left to: (leftTable fieldNamed: 'left_value').
	(self typeResolverFor: Parent) register: aDescriptor.
GlorpBookDescriptorSystem >> descriptorForRightChild: aDescriptor
| rightTable |
rightTable := self tableNamed: 'RIGHTCHILDTABLE'.
aDescriptor table: rightTable.
(aDescriptor newMapping: DirectMapping)
from: #id to: (rightTable fieldNamed: 'id').
(aDescriptor newMapping: DirectMapping)
from: #top to: (rightTable fieldNamed: 'top').
(aDescriptor newMapping: DirectMapping)
from: #right to: (rightTable fieldNamed: 'right_value').
(self typeResolverFor: Parent) register: aDescriptor.
If you look at the last line in the definition of Descriptors for LeftChild
and RightChild you'll notice we're registering the Descriptor in the
Type Resolver of the Parent class; both child classes, unless overriden,
will continue having their default resolver.
Playing with instances
Now we can play with some sample instances
session inUnitOfWorkDo: [
	session register: (LeftChild new top: 'Left top'; left: 'I am a left child').
	session register: (RightChild new top: 'Right top'; right: 'I am a right child').
].
With the setup above, we can write queries like the following one which
query the Parent class:
(session read: Parent)
>>> an OrderedCollection(a RightChild a LeftChild)
We can still write queries directly on the subclasses
(session read: LeftChild)
There is one restriction on polymorphic queries when using
HorizontalTypeResolver (a table for each Concrete Class) which is one can
not use orderBy:. The query makes multiple requests to the database as it
has to read both tables, so we cannot have the database order the results
for use. As a result the following request will raise an exception becausehorizontal resolvers can't order.
((Query read: Parent) orderBy: #top) executeIn: sessionOne table for all classes
In this alternate approach for table organization, there is one table that holds the data
for all objects in the hierarchy. In this example the one table is called
ALL_DATA. We include an object_type column used to store the type
of the object in the row. This allows GLORP to create an instance of the
correct class when it reads a row in the table. Note
that regardless of what type of object is in a row, one column,
either left_value or right_value, will be null.
While this method does waste space in the database, performing a polymorphic
query is faster as there is only one table to access.
We start by describing the new Type Resolver for the Parent class.
GlorpBookDescriptorSystem >> typeResolverForParent
	^FilteredTypeResolver forRootClass: Parent
The class definitions remain the same as in the Table for each concrete class example. The descriptor changes a bit.
GlorpBookDescriptorSystem >> descriptorForParent: aDescriptor
	| table |
	table := self tableNamed: 'ALL_DATA'.
	aDescriptor table: table.
	(aDescriptor newMapping: DirectMapping)
		from: #id to: (table fieldNamed: 'id').
	(aDescriptor newMapping: DirectMapping)
		from: #top to: (table fieldNamed: 'top').
	(self typeResolverFor: Parent)
		register: aDescriptor abstract: true
Since we use a different resolver, we need to supply values for object_type
column and need more information for the Parent class.
GlorpBookDescriptorSystem >> descriptorForLeftChild: aDescriptor
	| leftTable |
	leftTable := self tableNamed: 'ALL_DATA'.
	aDescriptor table: leftTable.
	(aDescriptor newMapping: DirectMapping)
		from: #id to: (leftTable fieldNamed: 'id').
	(aDescriptor newMapping: DirectMapping)
		from: #top to: (leftTable fieldNamed: 'top').
	(aDescriptor newMapping: DirectMapping)
		from: #left to: (leftTable fieldNamed: 'left_value').
	(self typeResolverFor: Parent)
		register: aDescriptor
		keyedBy: 'L'
		field: (leftTable fieldNamed: 'object_type').
Note how to indicate the value of the object_type column for
LeftChild objects with the resolver.
The argument for the keyedBy: parameter is the String 'L' but it could be any String of your preference, like the class name. Keep in mind that the shorter the key, the less storage space it will take, and also less bandwidth used.
GlorpBookDescriptorSystem >> descriptorForRightChild: aDescriptor
	| rightTable |
	rightTable := self tableNamed: 'ALL_DATA'.
	aDescriptor table: rightTable.
	(aDescriptor newMapping: DirectMapping)
		from: #id to: (rightTable fieldNamed: 'id').
	(aDescriptor newMapping: DirectMapping)
		from: #top to: (rightTable fieldNamed: 'top').
	(aDescriptor newMapping: DirectMapping)
		from: #right to: (rightTable fieldNamed: 'right_value').
	(self typeResolverFor: Parent)
		register: aDescriptor
		keyedBy: 'R'
		field: (rightTable fieldNamed: 'object_type').
Even though Parent is still an abstract class, Glorp requires us to given
the mappings for the Parent instance variables. If Parent were not abstract
we would have to provide a key value for the column object_type.
GlorpBookDescriptorSystem >> tableForALL_DATA: aTable
	(aTable createFieldNamed: 'top' type: (platform varChar: 50)).
	(aTable createFieldNamed: 'left_value' type: (platform varChar: 50)).
	(aTable createFieldNamed: 'right_value' type: (platform varChar: 50)).
	(aTable createFieldNamed: 'object_type' type: (platform varChar: 2)).
	(aTable createFieldNamed: 'id' type: (platform sequence)) bePrimaryKey.
About inheritance with Type Resolvers
Although in our example with the class Parent was the superclass of both
LeftChild and RightChild, in Glorp terms it is not required that
child Descriptors share a common class ancestor, as far as they have the same
class attributes as the parent Descriptor.
Under the hood
How Glorp expressions work
At this point you might have noticed that we use blocks in many places to specify the where expression, retrieve a particular field, order the results, and many other things.
Although we use blocks for the convenience and readability they provide, once assigned to a Glorp object such as
SimpleQuery, Glorp converts the block to a Glorp expression, depending
on the context it may be any of the subclasses of GlorpExpression.
query where: [:each | each attribute > 100]
To convert the block to an expression, Glorp passes a MessageArchiver as the
first argument of the block, the message archiver will intercept all the message sends vía doesNotUnderstand: hook,
and will return another archiver, so the next message send is handled by the
new archiver and so on. With this strategy it will construct a tree
of instances of GlorpExpression.
Using each as the block argument name can be misleading, but it is used
by convention, but it has more sense in the context of a filtering expression
than in a retrieve: or groupBy:.
Because it uses doesNotUnderstand: as a way to build the expression tree,
it is possible that some selectors will be highlighted by Pharo as not
implemented, in particular salectors that are used to instantiate
FunctionExpression's.
About special selectors
When writing blocks that involve more than one condition, we don't use
and: nor or: selectors, and instead we use AND: and OR:
respectively. The same applies for isNil and notNil. This is so
because the compiler optimizes certain message sends, including the ones
mentioned before.
Example of special selectors:
query where: [:each |
 each attributeOne > 100 OR: [
	each attributeTwo notNIL AND: [
		each attributeThree isNIL ] ] ]
Function expressions
The special selectors mentioned before are nothing but a particular case of a
FunctionExpression, but as those there are many others, consider the
following Glorp query:
SimpleQuery read: Person where: [:each |
	each lastName asUppercase similarTo: 'GOLD%' ]
You can see there that we send the asUppercase message to the lastName
attribute and then similarTo: to that result. The previous query will produce something like this:
SELECT * FROM Person WHERE UPPER(lastName) LIKE 'GOLD%'
It is very likely that the similarTo: selector will be highlighted
as missing or not implemented in the current image. This is so because
the MessageArchiver will resolve the symbol to an instance of one
of the subclasses of FunctionExpression. It achieves it by rebuilding
the archiver as it consumes the selectors, you can find how it does by
looking for the implementors of rebuildOn:startingFrom:withOuterScopeBase:.
In the middle of those implementors you'll find senders to
getFunction:arguments:, this in turn will query the platform
for the list of functions available, which will end up creating
the list of default functions by sending createBasicFunctionsFor:
in to the FunctionExpression class.
If you ever need to add functions not supported by default, you can extend
the functions in FunctionExpression class >> createBasicFunctionsFor:
or by adding them to your current platform. Also you can read there the list
of available symbol functions and their default mapping to SQL functions.
Glorp class model diagram
The following diagram provides an outline of the most important classes and attributes of Glorp's object model.
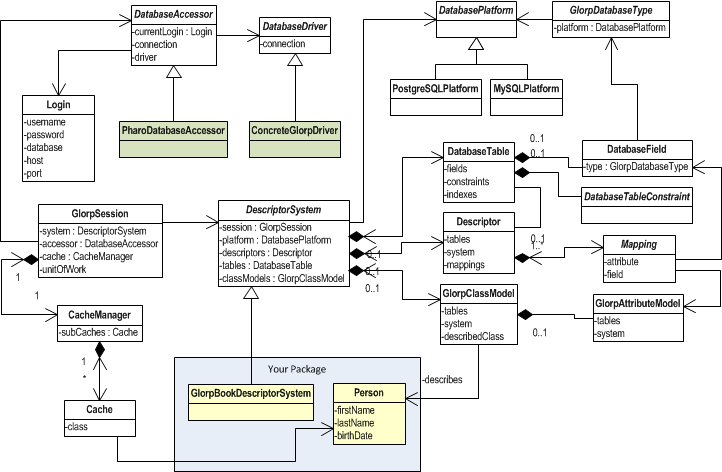
Appendix A: Basic Relational Databases Concepts
Tables
A table is a collection of related data held in a structured format within a database. It consists of fields (columns), and rows.
In relational databases and flat file databases, a table is a set of data elements (values) using a model of vertical columns (identifiable by name) and horizontal rows, the cell being the unit where a row and column intersect.
A table has a specified number of columns, but can have any number of rows. Each row is identified by one or more values appearing in a particular column subset. The columns subset which uniquely identifies a row is called the primary key.
Rows
In the context of a relational database, a row —also called a record or tuple— represents a single, implicitly structured data item in a table. In simple terms, a database table can be thought of as consisting of rows and columns or fields. Each row in a table represents a set of related data, and every row in the table has the same structure.
Columns
For example, in a table that represents companies, each row would represent a single company. Columns might represent things like company name, company street address, whether the company is publicly held, its VAT number, etc.. In a table that represents the association of employees with departments, each row would associate one employee with one department.
Constraints
Constraints make it possible to further restrict the domain of an attribute. For instance, a constraint can restrict a given integer attribute to values between 1 and 10. Constraints provide one method of implementing business rules in the database. SQL implements constraint functionality in the form of check constraints.
Constraints restrict the data that can be stored in relations. These are usually defined using expressions that result in a boolean value, indicating whether or not the data satisfies the constraint. Constraints can apply to single attributes, to a tuple (restricting combinations of attributes) or to an entire relation.
Since every attribute has an associated domain, there are constraints (domain constraints). The two principal rules for the relational model are known as entity integrity and referential integrity.
Primary Key
A primary key uniquely specifies a tuple within a table. In order for an attribute to be a good primary key it must not repeat. While natural attributes (attributes used to describe the data being entered) are sometimes good primary keys, surrogate keys are often used instead.
A surrogate key is an artificial attribute assigned to an object which uniquely identifies it (for instance, in a table of information about students at a school they might all be assigned a student ID in order to differentiate them).
The surrogate key has no intrinsic (inherent) meaning, but rather is useful through its ability to uniquely identify a tuple. Another common occurrence, especially in regard to N:M cardinality is the composite key. A composite key is a key made up of two or more attributes within a table that (together) uniquely identify a record. (For example, in a database relating students, teachers, and classes. Classes could be uniquely identified by a composite key of their room number and time slot, since no other class could have exactly the same combination of attributes. In fact, use of a composite key such as this can be a form of data verification, albeit a weak one.
Foreign Keys
A foreign key is a field in a relational table that matches the primary key column of another table. The foreign key can be used to cross-reference tables. Foreign keys do not need to have unique values in the referencing relation. Foreign keys effectively use the values of attributes in the referenced relation to restrict the domain of one or more attributes in the referencing relation.
Indexes
An index is one way of providing quicker access to data. Indices can be created on any combination of attributes on a relation. Queries that filter using those attributes can find matching tuples randomly using the index, without having to check each tuple in turn. This is analogous to using the index of a book to go directly to the page on which the information you are looking for is found, so that you do not have to read the entire book to find what you are looking for.
Relational databases typically supply multiple indexing techniques, each of which is optimal for some combination of data distribution, relation size, and typical access pattern.
Indices are usually not considered part of the database, as they are considered an implementation detail, though indices are usually maintained by the same group that maintains the other parts of the database. It should be noted that use of efficient indexes on both primary and foreign keys can dramatically improve query performance.
Relations
Joins
A SQL join clause combines records from two or more tables in a relational database. A JOIN is a means for combining fields from two tables (or more) by using values common to each
ANSI-standard SQL specifies five types of JOIN: INNER, LEFT OUTER, RIGHT OUTER, FULL OUTER and CROSS. As a special case, a table (base table, view, or joined table) can JOIN to itself in a self-join.
INNER JOINs
An inner join requires each record in the two joined tables to have matching records, and is a commonly used join operation in applications but should not be assumed to be the best choice in all situations. Inner join creates a new result table by combining column values of two tables (A and B) based upon the join-predicate. The query compares each row of A with each row of B to find all pairs of rows which satisfy the join-predicate. When the join-predicate is satisfied by matching non-NULL values, column values for each matched pair of rows of A and B are combined into a result row.
The result of the join can be defined as the outcome of first taking the Cartesian product (or Cross join) of all records in the tables (combining every record in table A with every record in table B) and then returning all records which satisfy the join predicate. Actual SQL implementations normally use other approaches, such as hash joins or sort-merge joins, since computing the Cartesian product is slower and would often require a prohibitively large memory space to store.
OUTER JOINs
The joined table retains each record—even if no other matching record exists. Outer joins subdivide further into left outer joins, right outer joins, and full outer joins, depending on which table's rows are retained (left, right, or both).
The result of a left outer join (or simply left join) for tables A and B always contains all records of the "left" table (A), even if the join-condition does not find any matching record in the "right" table (B). This means that if the ON clause matches 0 (zero) records in B (for a given record in A), the join will still return a row in the result (for that record)—but with NULL in each column from B. A left outer join returns all the values from an inner join plus all values in the left table that do not match to the right table, including rows with NULL (empty) values in the link field.
For example, this allows us to find an employee's department, but still shows employees that have not been assigned to a department (contrary to the inner-join example above, where unassigned employees were excluded from the result).
Data manipulation language (DML) queries
SELECT
A SELECT statement retrieves zero or more rows from one
or more database tables or database views. In most applications, SELECT is the
most commonly used data manipulation language (DML) command. As SQL is a
declarative programming language, SELECT queries specify a result set, but do
not specify how to calculate it. The database translates the query into a "query
plan" which may vary between executions, database versions and database
software. This functionality is called the "query optimizer" as it is
responsible for finding the best possible execution plan for the query, within
applicable constraints.
INSERT
An SQL INSERT statement adds one or more
records to any single table in a relational database.
The number of columns and values must be the same. If a column is not specified, the default value for the column is used. The values specified (or implied) by the INSERT statement must satisfy all the applicable constraints (such as primary keys, CHECK constraints, and NOT NULL constraints). If a syntax error occurs or if any constraints are violated, the new row is not added to the table and an error returned instead.
UPDATE
An SQL UPDATE statement changes the data of one or more records in a
table. Either all the rows can be updated, or a subset may be chosen using a
condition.
In some databases, such as PostgreSQL, when a FROM clause is present, what essentially happens is that the target table is joined to the tables mentioned in the fromlist, and each output row of the join represents an update operation for the target table. When using FROM, one should ensure that the join produces at most one output row for each row to be modified. In other words, a target row shouldn't join to more than one row from the other table(s). If it does, then only one of the join rows will be used to update the target row, but which one will be used is not readily predictable.
Because of this indeterminacy, referencing other tables only within sub-selects is safer, though often harder to read and slower than using a join.
DELETE
In the database structured query language (SQL), the DELETE
statement removes one or more records from a table. A subset may be defined for
deletion using a condition, otherwise all records are removed.
Any rows that match the WHERE condition will be removed from the table. If the WHERE clause is omitted, all rows in the table are removed. The DELETE statement should thus be used with caution.
The DELETE statement does not return any rows; that is, it will not generate a result set.